Über bksmrt
Alles, was du über die App wissen musst — von den Grundlagen bis zu fortgeschrittenen Funktionen.
Keine Ergebnisse gefunden.
Was ist bksmrt?
bksmrt ist eine persönliche Bibliotheksverwaltungs-App für iOS. Du katalogisierst deine physische Büchersammlung per ISBN-Scan, weist jeden Band einem Raum und Regal zu, verfolgst Leihvorgänge und behältst den Gesamtwert deiner Sammlung im Blick. Alle Daten werden sicher in der Cloud gespeichert.
Für wen ist die App gedacht?
bksmrt ist für Einzelpersonen oder Haushalte konzipiert, die ihre private Büchersammlung digital erfassen möchten. Du meldest dich mit einer eigenen E-Mail-Adresse an und verwaltest ausschließlich deinen persönlichen Bestand.
Was bksmrt (noch) nicht ist
- Kein öffentliches soziales Netzwerk — es gibt keine Feeds und keine öffentlichen Profile. Einzelne Bücher teilst du gezielt mit Freunden, die du selbst bestätigst
- Kein E-Book-Reader — bksmrt verwaltet physische Bücher
- Keine Preisvergleichs-Plattform — es werden Listenpreise angezeigt, aber keine Kaufangebote verglichen
- Keine vollständige Weiterverkaufs-Bewertung — in der Detailansicht eines Buches ist bereits ein Platzhalter sichtbar, die tatsächliche Wertbestimmung ist als Pro-Funktion geplant
Loslegen
Konto erstellen
Öffne die App und tippe auf „Registrieren". Gib deinen Namen, deine E-Mail-Adresse und ein Passwort (mindestens 8 Zeichen) ein. Die Registrierung ist sofort abgeschlossen — eine E-Mail-Bestätigung ist nicht erforderlich.
Anmelden
Tippe auf der Startseite auf „Anmelden" und gib deine E-Mail-Adresse und dein Passwort ein. Die App merkt sich deine Sitzung, sodass du dich beim nächsten Start nicht erneut anmelden musst.
Passwort vergessen
Tippe auf dem Anmeldebildschirm auf „Passwort vergessen" und gib deine E-Mail-Adresse ein. Du erhältst eine E-Mail mit einem 6-stelligen Code. Gib den Code in der App ein und lege anschließend ein neues Passwort fest (mindestens 8 Zeichen).
Startbildschirm im Überblick
Der Startbildschirm fasst die wichtigsten Zahlen und Aktivitäten deiner Bibliothek auf einen Blick zusammen.
Begrüßung & Statistik-Streifen
Oben steht eine tageszeitabhängige Begrüßung mit deinem Vornamen. Direkt darunter findest du einen Statistik-Streifen mit drei Kacheln: Gesamtanzahl deiner Bücher, Prozentsatz gelesener Bücher und Anzahl verliehener Bücher. Jede Kachel ist tippbar und öffnet die Bibliothek vorgefiltert auf die entsprechende Auswahl.
Lesefortschritts-Balken
Unterhalb des Statistik-Streifens zeigt ein Fortschrittsbalken, welchen Anteil deiner Bibliothek du bereits gelesen hast. Der Balken aktualisiert sich automatisch, sobald du ein Buch als „Gelesen" markierst.
Aktuell lese ich
Bücher mit dem Lesestatus „Lese gerade" erscheinen als horizontale Cover-Liste. Die Sektion ist ausgeblendet, solange du nichts aktiv liest.
Zuletzt hinzugefügt
Eine horizontale Cover-Galerie der zehn zuletzt erfassten Bücher. Tippe auf ein Cover, um die Detailansicht zu öffnen.
Bücher erfassen
Neue Bücher fügst du am schnellsten über den Kamera-Tab in der Mitte der Tab-Leiste hinzu.
ISBN-Scan
Wähle den Barcode-Modus und halte die Kamera auf den ISBN-Barcode auf der Rückseite des Buches. Die App erkennt den Code automatisch und sucht Metadaten (Titel, Autor, Verlag, Cover) über mehrere Anbieter. Bestätige die Daten, wähle optional ein Format (Taschenbuch, Hardcover, …) und tippe auf „Hinzufügen".
Nach einem erfolgreichen Scan gibt es eine Pause von 4 Sekunden, bevor der Scanner den nächsten Code akzeptiert — so werden versehentliche Doppelscans verhindert.
Cover-Foto & manuelle Suche
Im Cover-Modus kannst du ein Buchcover fotografieren (experimentell). Im Text-Modus tippst du einen Titel oder Autorennamen ein und durchsuchst Google Books direkt. Beide Wege enden in derselben Bestätigungsansicht wie beim Barcode-Scan.
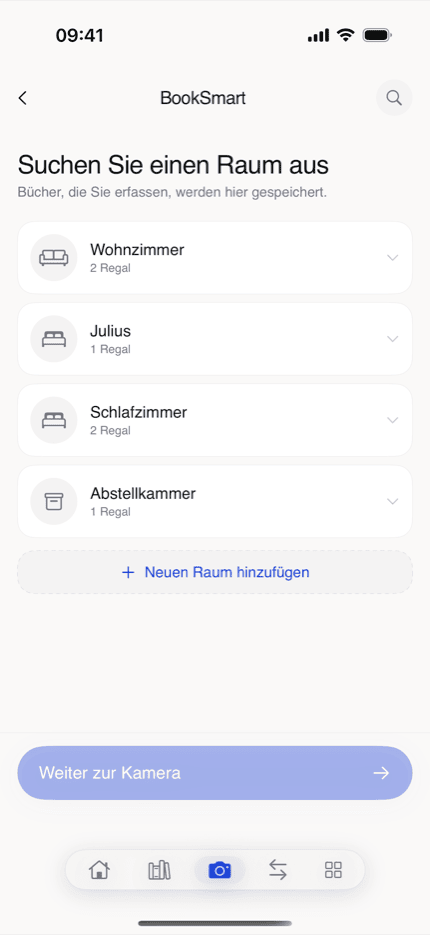
Standort vorab auswählen
Bevor der Scanner startet, kannst du optional einen Raum und ein Regal auswählen. Alle in dieser Scan-Sitzung erfassten Bücher werden dann automatisch diesem Standort zugewiesen. Du kannst den Standort auch weglassen und ihn später in der Buchdetailansicht nachtragen.
Duplikate
Wenn eine ISBN bereits in deiner Bibliothek vorhanden ist, erscheint ein Hinweis. Du hast drei Möglichkeiten: ein zweites Exemplar hinzufügen, das vorhandene Buch aufrufen oder den Vorgang abbrechen.
Bücher ohne Netzwerk hinzufügen
Wenn du offline bist, erscheint ein Hinweisbanner im Scanner. Im Barcode- und Cover-Modus ist die ISBN-Abfrage dann nicht verfügbar — nutze stattdessen die manuelle Texteingabe, um das Buch zu suchen und vorläufig zu speichern. Das Buch wird sofort in deiner Bibliothek angezeigt und sobald du wieder online bist automatisch mit der Cloud synchronisiert.
Schnellaufnahme & Entwürfe
Wenn du viele Bücher in kurzer Zeit erfassen willst, ist die Schnellaufnahme schneller als der reguläre Scan-Tab. Die Bücher werden zunächst als Entwürfe gespeichert; du vervollständigst sie später.
Schnellaufnahme öffnen
Auf dem Startbildschirm oben rechts findest du ein kleines Kamera-Symbol mit Visiereffekt. Tippe darauf, um die Schnellaufnahme im Vollbildmodus zu öffnen.
Wie die Schnellaufnahme funktioniert
Halte die Kamera auf ein Buchcover. Die App erkennt Titel und Autor per On-Device-Texterkennung und speichert das Buch automatisch als Entwurf, sobald die Erkennung stabil ist — du bekommst eine kurze Bestätigung („Buch als Entwurf gespeichert"). Schwenke direkt weiter zum nächsten Buch.
Falls die automatische Erkennung nicht greift, kannst du jederzeit den runden Auslöser unten in der Mitte tippen. Die App nimmt dann den aktuellen Frame, errät Titel und Autor und legt ebenfalls einen Entwurf an.
Entwürfe auf dem Startbildschirm
Sobald mindestens ein Entwurf vorhanden ist, erscheint auf dem Startbildschirm eine Zeile „N Buch/Bücher zur Überprüfung". Tippe darauf, um den Überprüfungsdialog zu öffnen.
Entwürfe vervollständigen
Im Überprüfungsdialog tippst du einen Entwurf an. Es öffnet sich ein Formular mit allen Metadaten (Titel, Autor, Verlag, Jahr, Format). Über die Schaltfläche „Online suchen" kannst du Google Books mit den vorhandenen Werten abfragen und die Felder automatisch füllen lassen. Speichere am Ende, um den Entwurf in einen vollständigen Bibliotheks-Eintrag zu überführen.
Mit einer Wisch-Geste nach links entfernst du einen Entwurf, falls er versehentlich aufgenommen wurde.
Deine Bibliothek
Über den zweiten Tab erreichst du deine gesamte Büchersammlung mit drei verschiedenen Ansichten.
Rasteransicht
Zeigt alle Bücher als dreispaltiges Cover-Raster. Kleine Symbole in der oberen rechten Ecke jedes Covers zeigen Besitz- und Lesestatus an. Ideal für einen schnellen visuellen Überblick.
Listenansicht
Bücher werden gruppiert nach Raum aufgelistet. Jeder Eintrag zeigt Cover, Titel, Autor, Regal-Standort und Statuspillen. Bücher ohne Standort erscheinen am Ende der Liste unter „Ohne Standort".
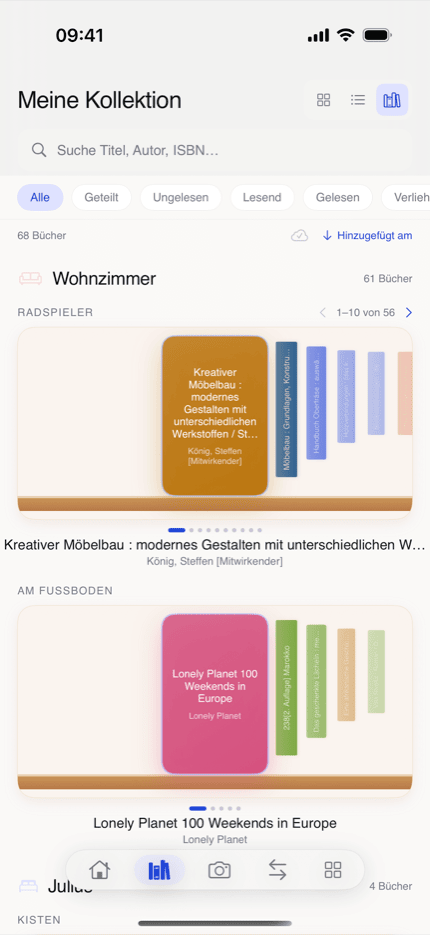
Regalansicht
Eine visuelle Regaldarstellung je Regal: das fokussierte Buch ist als vollständiges Cover sichtbar, benachbarte Bücher als Buchrücken mit gedrehtem Titel. Wische horizontal, um durch die Bücher zu blättern. Tippe auf ein Buch für die Detailansicht.
Filtern
Über die Filter-Chips oberhalb der Bücherliste kannst du die Ansicht einschränken:
- Alle — gesamte Bibliothek
- Ungelesen — Bücher ohne Lesestatus
- Am Lesen — Bücher mit Lesestatus „Lese gerade"
- Gelesen — abgeschlossene Bücher
- Verliehen — Bücher, die du gerade nicht bei dir hast
- Geliehen — Bücher, die du von anderen ausgeliehen hast
Sortieren
Tippe auf das Sortier-Symbol rechts neben der Bücheranzahl, um die Sortierung zu ändern:
- Datum hinzugefügt — neueste zuerst (Standard)
- Titel — alphabetisch
- Autor — alphabetisch nach Nachname
- Preis — teuerste zuerst
Tippe erneut auf die aktive Sortieroption, um die Richtung (aufsteigend/absteigend) umzukehren. Ein Pfeil-Symbol zeigt die aktuelle Richtung an. Bücher ohne Preis erscheinen bei der Preis-Sortierung immer am Ende.
Nach Preisstatus filtern
Du kannst dir gezielt nur Bücher mit einem hinterlegten Preis oder nur Bücher ohne Preis anzeigen lassen — hilfreich, um schnell die Lücken in deiner Preisliste zu schließen. Den Schnellzugriff auf die unpreisten Bücher findest du außerdem direkt auf dem Startbildschirm unter dem Wert-Widget.
Suche in der Bibliothek
Tippe auf das Suchfeld in der Bibliothek. Im Bibliothek-Modus werden deine vorhandenen Bücher nach Titel, Autor oder ISBN gefiltert. Für die Online-Suche nach neuen Büchern und die Kauf-Optionen siehe den eigenen Abschnitt „Online-Suche & Kauf-Optionen" weiter unten.
Synchronisierungsstatus
Ein Wolken-Symbol in der Bibliotheks-Toolbar zeigt dir den aktuellen Sync-Status:
- Wolke mit Häkchen — alles synchronisiert
- Wolke mit Pfeil — ausstehende Änderungen werden übertragen
- Wolke mit X — ein Synchronisierungsfehler ist aufgetreten
Tippe auf das Symbol, um eine Übersicht der ausstehenden Aktionen zu sehen.
Standortverwaltung
Im letzten Tab verwaltest du die physische Struktur deiner Bibliothek: Räume und deren Regale.
Räume anlegen
Tippe auf das +-Symbol und vergib einen Namen für den Raum (z. B. „Wohnzimmer"). Wähle einen Raumtyp aus (Wohnzimmer, Schlafzimmer, Büro, Bibliothek, Lager, Flur, Küche, Kinderzimmer) und eine Akzentfarbe. Du kannst Regale direkt beim Anlegen des Raums hinzufügen.
Regale verwalten
Jeder Raum kann beliebig viele Regale enthalten (z. B. „Oberes Regal", „Reihe A"). Tippe auf das Bearbeiten-Symbol eines Raums, um Regale hinzuzufügen, umzubenennen oder zu löschen. Beim Löschen eines Regals verlieren die dort platzierten Bücher ihren Standort — sie werden nicht gelöscht.
Kapazität
Du kannst für jedes Regal eine maximale Buchanzahl festlegen. Die Standortübersicht zeigt dann, wie viel Prozent der Gesamtkapazität belegt sind. Die Kapazitätsangabe ist optional.
Bücher einem Regal zuweisen
Öffne die Detailansicht eines Buches und tippe auf „Bearbeiten". Im Abschnitt „Standort" wählst du Raum und Regal aus. Der neue Standort wird sofort am Buch gespeichert.
Leihe
Der vierte Tab zeigt alle Bücher, die du gerade verliehen hast oder ausgeliehen hast.

Buch verleihen
Öffne das Buch und tippe auf „Verleihen". Gib den Namen der Person, das Datum und optional eine Notiz ein. Das Buch erscheint dann im Tab „Verliehen" und erhält den Status „Verliehen". Der ursprüngliche Besitzstatus wird bei Rückgabe automatisch wiederhergestellt.
Buch ausleihen (von anderen)
Füge das Buch zu deiner Bibliothek hinzu und wähle beim Verleihen-Dialog den Typ „Ausgeliehen von". Gib den Namen des Eigentümers und das Datum an. Das Buch erscheint im Tab „Geliehen".
Rückgabe erfassen
Tippe auf eine Karte im Leihe-Tab. Im Dialog „Rückgabe" wählst du das Rückgabedatum und kannst eine optionale Notiz hinzufügen. Das Buch verschwindet danach aus der Leihe-Liste und erhält wieder den Status „Im Besitz".
Leih-Details nachträglich bearbeiten
Öffne die Buchdetailansicht. In der Statuszeile siehst du den aktuellen Leih-Eintrag mit einer Bearbeiten-Schaltfläche. Dort kannst du Datum, Kontaktname und Notiz nachträglich korrigieren, ohne einen neuen Eintrag zu erstellen.
Buchdetails
Tippe auf ein Buch in der Bibliothek, um die Detailansicht zu öffnen.
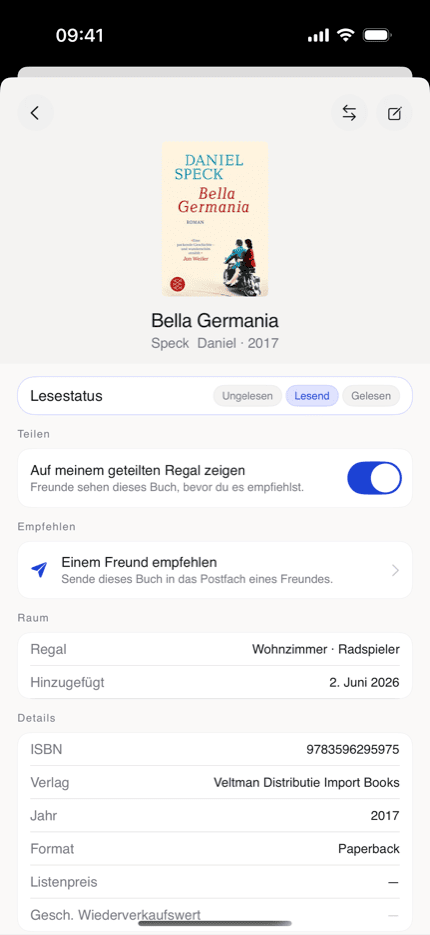
Basisinformationen
Die Detailansicht zeigt Cover, Titel, Autor(en), ISBN, Verlag, Erscheinungsjahr, Sprache und den aktuellen Listenpreis (sofern bekannt). Daneben findest du einen Platzhalter für den geschätzten Wiederverkaufswert — die tatsächliche Bewertung folgt als Pro-Funktion. Die Buchmetadaten stammen aus dem gemeinsamen Katalog und sind für alle Nutzer mit demselben ISBN-Eintrag identisch.
Standort, Format & Zustand bearbeiten
Tippe auf „Bearbeiten", um Standort (Raum und Regal), Format (Taschenbuch, Hardcover, E-Book, Hörbuch, Sonstige), Zustand und eine persönliche Bewertung (1–5 Sterne) sowie Notizen zu ändern. Deine Änderungen werden direkt am Buch gespeichert.
Lesestatus
Im Bearbeiten-Dialog kannst du den Lesestatus setzen:
- Lese gerade — das Buch erscheint auf dem Startbildschirm unter „Aktuell lese ich"
- Gelesen — wird in Statistiken und Filter gezählt
Lesestatus und Besitzstatus sind unabhängig voneinander — ein verliehenes Buch kann gleichzeitig als „Gelesen" markiert sein.
Preis festlegen
Im Bearbeiten-Dialog findest du das Feld „Preis (€)". Trage deinen persönlichen Preis ein (Punkt oder Komma als Dezimaltrennzeichen werden akzeptiert). Dein persönlicher Preis hat Vorrang vor dem automatisch hinterlegten Listenpreis. Der eingetragene Preis fließt in den Bibliothekswert auf dem Startbildschirm ein.
Leih-Verlauf
Am Ende der Detailansicht siehst du den Leih-Verlauf des Buches: wann du es verliehen, ausgeliehen oder zurückbekommen hast — jeweils mit Datum, Kontaktname und optionaler Notiz. Einträge lassen sich rückdatieren und nachträglich bearbeiten. Bücher, die du nie verliehen oder ausgeliehen hast, haben keinen Eintrag.
Buch löschen
Tippe in der Detailansicht auf „Löschen" und bestätige den Dialog. Das Buch wird aus deiner Bibliothek entfernt. Diese Aktion ist nicht rückgängig zu machen. Der gemeinsame Metadaten-Katalog wird nicht verändert.
Bibliothekswert
bksmrt rechnet mit dem effektiven Preis jedes Buches — dein persönlich eingetragener Preis hat Vorrang vor dem automatisch gefundenen Listenpreis. Verkaufte Bücher zählen nicht mit.
Preise pro Buch festlegen
Preise trägst du in der Buchdetailansicht im Bearbeiten-Dialog unter „Preis (€)" ein — siehe den Abschnitt „Buchdetails → Preis festlegen". Punkt oder Komma als Dezimaltrennzeichen funktionieren beide.
Bücher mit oder ohne Preis finden
In der Bibliothek schränken die Filter-Chips „Mit Preis" und „Ohne Preis" die Liste auf den gewünschten Preisstatus ein — siehe „Deine Bibliothek → Nach Preisstatus filtern". So findest du schnell die Lücken in deiner Preisliste.
Ungelesener Stapel
Wenn du ungelesene Bücher mit einem Preis in deiner Sammlung hast, erscheint auf dem Startbildschirm die Zeile „Ungelesener Stapel" mit der Anzahl und dem kumulierten Wert dieser Bücher. Tippe darauf, um die Bibliothek gefiltert auf „Ungelesen" zu öffnen.
Online-Suche & Kauf-Optionen
Über die Online-Suche findest du neue Bücher in mehreren Buch-Datenbanken gleichzeitig — und kannst sie direkt in deine Bibliothek übernehmen oder bei einem Buchhändler kaufen.
Suche öffnen
Tippe auf das Lupen-Symbol oben rechts auf dem Startbildschirm oder auf das Suchfeld in der Bibliothek und wechsle dort in den Reiter Online.
Schnell- oder Gründlich-Modus
Unter dem Reiter siehst du zwei Pillen-Schaltflächen:
- Schnell — fragt nur Google Books ab (~300 ms). Gut für populäre internationale Titel.
- Gründlich — durchsucht parallel Deutsche Nationalbibliothek, Google Books und Open Library (~1–1,5 s). Empfohlen für deutschsprachige und nische Titel, bei denen Google Books oft Lücken hat.
Beim Tippen auf eine Pille wird sowohl der Modus gewechselt als auch die Suche gestartet. Die zuletzt gewählte Einstellung bleibt erhalten.
Was die Trefferliste sortiert
Deutschsprachige Treffer (ISBN-Präfix 978-3-) erscheinen oben — so landet die „Buch kaufen"-Verlinkung des obersten Treffers immer auf einem in DACH lieferbaren Titel. Treffer ohne ISBN werden nicht mehr verworfen, sondern mit dem Hinweis „ISBN fehlt" angezeigt; beim Hinzufügen versucht die App, die ISBN über DNB und Google Books nachzuziehen.
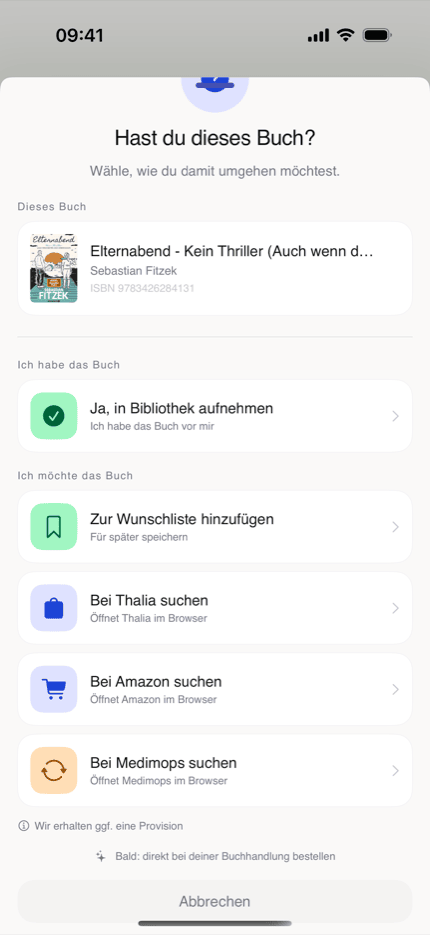
„Hast du dieses Buch?" — die Entscheidung
Wenn du auf das Plus-Symbol bei einem Treffer tippst, öffnet sich ein Dialog mit zwei klar getrennten Abschnitten:
- Ich habe das Buch — „Ja, in Bibliothek aufnehmen" übernimmt den Treffer als neues Buch in deine Sammlung.
- Ich möchte das Buch — füge den Titel deiner Wunschliste hinzu oder bestelle direkt bei deiner lokalen Buchhandlung, Thalia oder Amazon; weitere Händler (z. B. Medimops für Gebrauchtes) sind in Vorbereitung. Die Verlinkung öffnet die jeweilige Händler-Website im Browser.
Die lokale Buchhandlung steht dabei an erster Stelle: Über genialokal — die gemeinsame Online-Plattform inhabergeführter Buchhandlungen in DACH — bestellst du dein Buch bei einem unabhängigen Laden statt bei einer großen Kette. Diese Option ist kostenlos und für alle verfügbar, nicht nur für Pro.
Buchpreisbindung & Transparenz
Bei lieferbaren Neubüchern zeigen wir bewusst keinen Preisvergleich — in Deutschland gilt die Buchpreisbindung, der Preis ist bei allen Händlern identisch. Pro Option steht daher genau ein Händler. Bei Käufen über die Buy-Schaltflächen erhalten wir eine Affiliate-Vergütung; das wird im Detail in der Datenschutzerklärung erläutert.
Doppelte Treffer
Ist die ISBN bereits in deiner Bibliothek, erscheint stattdessen die bekannte Duplikat-Abfrage (Zweites Exemplar hinzufügen / Vorhandenes Buch anzeigen / Abbrechen).
Zurück zur Trefferliste
Wenn du auf eine Kauf-Schaltfläche tippst, öffnet sich Safari. Bei der Rückkehr in die App bleibt die Trefferliste erhalten — du kannst direkt weiterstöbern, ohne erneut suchen zu müssen.
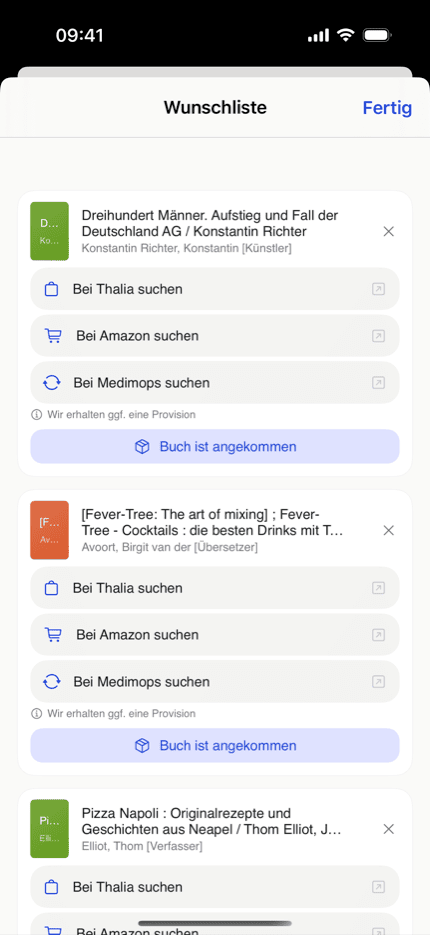
Wunschliste
Auf der Wunschliste sammelst du Bücher, die du noch nicht besitzt, aber lesen möchtest — getrennt von deiner Bibliothek, damit sie Bibliothekswert und Statistiken nicht verfälschen.
Ein Buch auf die Wunschliste setzen
Tippe in der Online-Suche oder direkt nach einem Scan im Dialog „Ich möchte das Buch" auf „Zur Wunschliste hinzufügen". Das Buch landet auf deiner Wunschliste, ohne deine Bibliothek zu verändern.
Wunschliste durchstöbern
Deine Wunschliste erreichst du direkt vom Startbildschirm. Tippe auf einen Eintrag, um mit einem Tippen ein Exemplar bei Thalia zu finden — oder übernimm das Buch in deine Bibliothek, sobald es bei dir eingezogen ist.
Freunde & geteilte Regale
bksmrt hat eine private Freundesliste — keinen öffentlichen Feed. Du verbindest dich gezielt mit Menschen und teilst nur, was du teilen möchtest.

Einen @-Namen wählen
Damit dich Freunde finden können, vergibst du in deinem Profil einen @-Namen (3–20 Zeichen). Deine E-Mail-Adresse bleibt dabei privat. Über einen Schalter legst du fest, ob du über deinen Namen auffindbar bist.
Freunde hinzufügen
Suche im Freunde-Bereich nach dem @-Namen einer Person und sende eine Anfrage. Die andere Person muss sie annehmen — erst dann seid ihr verbunden. Eingehende Anfragen kannst du annehmen oder ablehnen.
Per Link einladen
Über „Freunde einladen" erzeugst du einen persönlichen Link (bksmrt.de/i/…). Wer ihn auf einem iPhone mit installierter App öffnet, kann dich mit einem Tippen als Freund hinzufügen. Ein Link fügt nie automatisch jemanden hinzu — die Bestätigung liegt immer bei dir.
Ein Regal teilen
Pro Buch entscheidest du mit dem Schalter „Auf meinem geteilten Regal zeigen", ob ein Freund es sieht. Standardmäßig ist alles privat. Deine Notizen und Preise bleiben immer privat — geteilt werden nur Titel, Autor und Cover.
Blockieren & entfernen
Über das Menü eines Freundes kannst du ihn entfernen oder blockieren. Beides entzieht sofort den Zugriff auf alles, was du geteilt hast.
Empfehlungen
Empfiehl Freunden Bücher aus deiner Bibliothek — mit einer persönlichen Notiz. Empfehlungen landen in einem Posteingang und lassen sich mit einem Tippen auf die Wunschliste übernehmen.
Ein Buch empfehlen
Öffne ein Buch in deiner Bibliothek und tippe auf „Empfehlen". Wähle einen Freund aus, füge optional eine kurze Notiz hinzu (deine Bewertung wird automatisch mitgeschickt) und sende. Das Versenden von Empfehlungen ist eine Pro-Funktion.
Empfehlungen empfangen
Empfehlungen erscheinen in deinem Posteingang auf dem Startbildschirm — mit Absender, Buch und Notiz. Das Empfangen ist immer kostenlos.
Auf die Wunschliste übernehmen
Tippe in einer Empfehlung auf „Zur Wunschliste", und das Buch wandert mit einem Tippen auf deine Wunschliste. Von dort findest du direkt ein Exemplar bei einer Buchhandlung.
Benachrichtigungen
Wenn du es erlaubst, wirst du benachrichtigt, sobald dir jemand ein Buch empfiehlt. Die App fragt erst nach Erlaubnis, wenn die erste Empfehlung eintrifft — nie beim Start. Übermittelt werden nur dein Name und der Buchtitel.
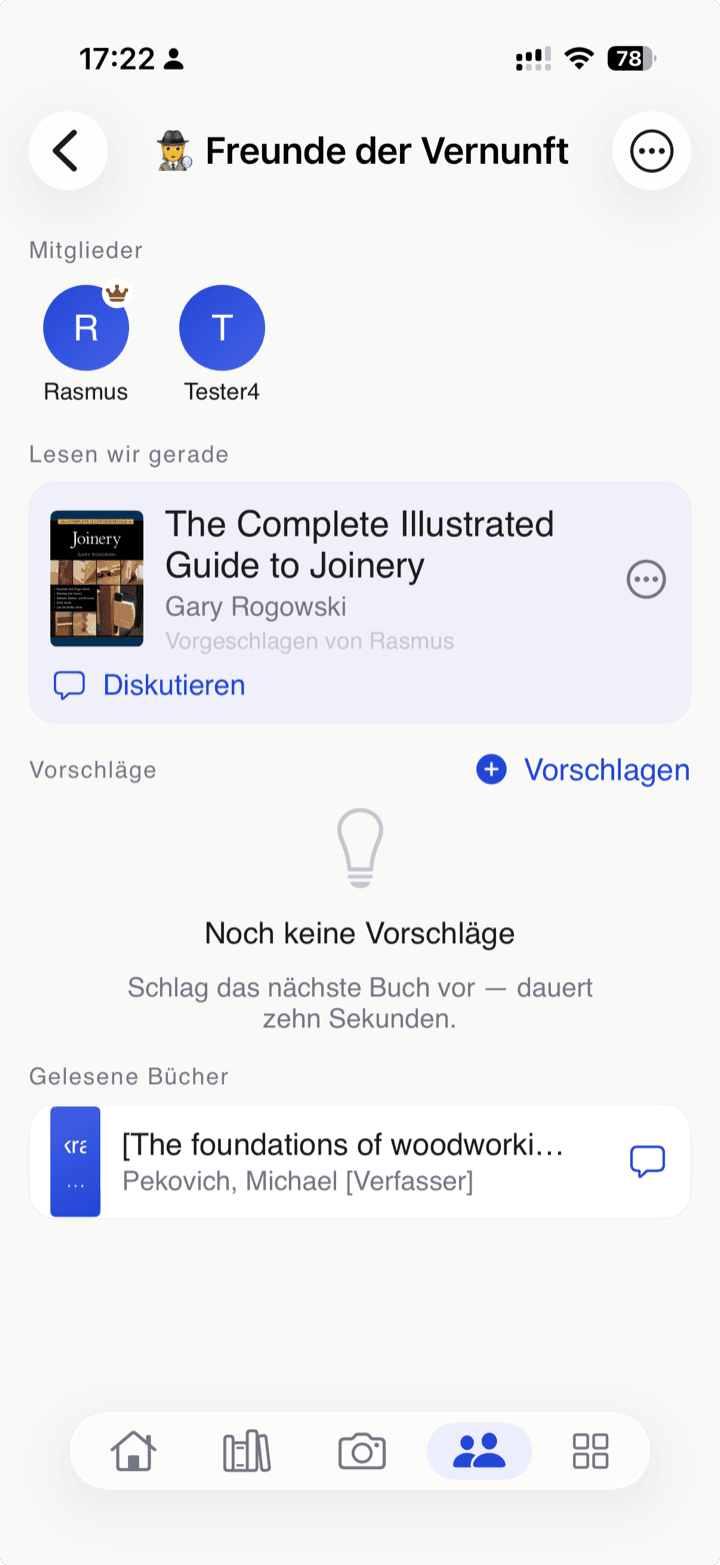
Buchclubs & Literaturkreise
Ein Buchclub bringt deine Lesegruppe in bksmrt zusammen: gemeinsam Bücher vorschlagen, über die nächste Lektüre abstimmen, jede Auswahl diskutieren und Exemplare untereinander verleihen. Deine Clubs findest du im Tab „Kreis".
Einen Club gründen
Im Tab „Kreis" erstellst du einen Club mit Namen und Emoji. Das Gründen eines Clubs ist eine Pro-Funktion — das Mitmachen ist für alle Mitglieder kostenlos.
Per Link beitreten
Jeder Club hat einen festen Einladungslink (bksmrt.de/c/…) und einen QR-Code. Wer ihn auf einem iPhone mit installierter App öffnet, tritt mit einem Tippen bei — ohne Freundschaftsanfrage, ohne Warteschlange. So holst du eine ganze Lesegruppe in wenigen Minuten an Bord.
Vorschlagen & abstimmen
Jedes Mitglied kann Bücher aus der eigenen Bibliothek, der Wunschliste oder der Online-Suche vorschlagen. Per Tippen stimmt ihr über die nächste gemeinsame Lektüre ab.
Aktuelle Lektüre & Diskussion
Der Gastgeber befördert einen Vorschlag zur „aktuellen Lektüre". Sie landet bei allen Mitgliedern als Empfehlung auf der Wunschliste — inklusive Benachrichtigung. Zu jedem Buch gibt es einen eigenen Diskussionsfaden, der auch nach dem Lesen erhalten bleibt.
Besitzen & ausleihen
Mit „Ich habe das Buch" zeigst du den anderen, dass du ein Exemplar besitzt. Sie können dich dann fragen, es auszuleihen — der Verleih wird wie gewohnt im Leihe-Tracker erfasst.
Mitglieder verwalten
Als Gastgeber kannst du den Einladungslink jederzeit neu erzeugen (der alte wird dann ungültig) sowie Mitglieder entfernen und bei Bedarf vom Club ausschließen. Clubs sind klein und privat — kein öffentliches Verzeichnis, keine Feeds.
bksmrt Pro
Die Kernfunktionen von bksmrt sind und bleiben kostenlos. Pro schaltet zusätzliche Funktionen frei und unterstützt die Weiterentwicklung.
Was ist kostenlos?
Bücher scannen und katalogisieren, ein Raum mit drei Regalen, Leihe-Tracking, Bibliothekswert, Wunschliste, Freunde, das Empfangen und Übernehmen von Empfehlungen sowie das Beitreten zu Buchclubs und Mitlesen — all das ist kostenlos.
Was bringt Pro?
Pro hebt das Limit auf unbegrenzt viele Räume und Regale, lässt dich Bücher an Freunde empfehlen, eigene Buchclubs gründen und moderieren, zeigt einen geschätzten Wiederverkaufswert mit Wert-Dashboard und erlaubt den Export deiner Bibliothek als CSV- oder GoodReads-Datei.
Kostenlos testen & kündigen
Pro kannst du 14 Tage kostenlos testen. Verwaltung und Kündigung laufen über deine Apple-ID; als Verbraucher:in in der EU hast du zusätzlich ein 14-tägiges Widerrufsrecht. Das Abo wird über den App Store abgewickelt.
Konto & Datenschutz
Alle Konto-Einstellungen erreichst du über das Avatar-Symbol oben rechts auf dem Startbildschirm.
Anzeigename ändern
In der Profilansicht kannst du deinen Anzeigenamen direkt bearbeiten. Tippe auf das Bearbeiten-Symbol neben deinem Namen, gib den neuen Namen ein und bestätige. Der Vorname wird im Begrüßungstext auf dem Startbildschirm verwendet.
Passwort ändern
Tippe in der Profilansicht auf „Passwort ändern". Die App sendet dir automatisch einen 6-stelligen Code an deine E-Mail-Adresse. Gib den Code ein und lege das neue Passwort fest (mindestens 8 Zeichen, zweimal eingeben).
Konto löschen (DSGVO – Recht auf Löschung)
Du kannst dein Konto und alle damit verbundenen Daten jederzeit unwiderruflich löschen. In der Profilansicht findest du ganz unten den Abschnitt „Gefahrenzone". Tippe auf „Konto löschen" und bestätige, indem du das Wort LÖSCHEN eintippst.
Was wird gelöscht:
- Alle deine Bücher, Standorte, Leihvorgänge und deine Wunschliste
- Dein Benutzerprofil und deine Anmeldedaten
- Alle lokal zwischengespeicherten Daten auf dem Gerät
Was bleibt erhalten:
- Der gemeinsame Buchkatalog (ISBN-Metadaten ohne Personenbezug) — dieser enthält keine personenbezogenen Daten
Die Löschung erfolgt serverseitig in einer atomaren Transaktion. Ein anonymisiertes Protokoll (SHA-256-Hash deiner Nutzer-ID) wird 90 Tage lang für Compliance-Zwecke aufbewahrt.
Abmelden
Tippe in der Profilansicht auf „Abmelden". Alle lokal zwischengespeicherten Daten werden vom Gerät entfernt. Beim nächsten Start der App kannst du dich erneut anmelden.
Offline & Synchronisierung
Wie funktioniert der Offline-Modus?
bksmrt speichert deine Bücher und Standorte lokal auf dem Gerät. Beim Start wird zunächst der lokale Zwischenspeicher geladen — die App ist sofort nutzbar, auch ohne Netzwerk. Im Hintergrund wird die Ansicht dann mit den aktuellen Server-Daten aktualisiert.
Bücher offline hinzufügen
Das Hinzufügen eines neuen Buches funktioniert auch ohne Netzwerk: Das Buch erscheint sofort in der Bibliothek. Sobald das Gerät wieder online ist, wird der Eintrag automatisch mit der Cloud synchronisiert. Dabei wird die vorläufige interne ID durch die Server-ID ersetzt — für dich als Nutzer ist dieser Wechsel unsichtbar.
Was funktioniert nicht ohne Netzwerk?
Folgende Aktionen erfordern eine Netzwerkverbindung und zeigen eine Fehlermeldung, wenn du offline bist:
- Buchdetails bearbeiten (Standort, Preis, Format, Zustand)
- Leihvorgänge erfassen oder bearbeiten
- Bücher löschen
- Räume und Regale verwalten
Der vollständige Offline-Support für diese Aktionen ist für eine spätere Version geplant.
Kontakt
Fragen, Feedback oder ein gefundener Fehler? Schreib uns: hello@bksmrt.de
What is bksmrt?
bksmrt is a personal physical-library management app for iOS. Catalogue your book collection via ISBN scan, assign every book to a room and shelf, track lending, and monitor the total value of your collection. All data is securely stored in the cloud.
Who is it for?
bksmrt is designed for individuals or households who want to digitally catalogue their private book collection. You sign in with your own email address and manage only your own library.
What bksmrt is not (yet)
- Not a public social network — there are no feeds and no public profiles. You share individual books deliberately with friends you confirm yourself
- Not an e-book reader — bksmrt manages physical books
- Not a price-comparison platform — it shows list prices but does not compare purchase offers
- No full resale-value estimation yet — a placeholder is already visible in each book's detail view; the actual valuation is planned as a Pro feature
Getting Started
Creating an account
Open the app and tap "Sign Up". Enter your name, email address, and a password (at least 8 characters). Registration completes immediately — no email confirmation is required.
Signing in
Tap "Sign In" on the welcome screen and enter your email and password. The app remembers your session so you don't need to sign in again on next launch.
Forgot your password?
Tap "Forgot password" on the sign-in screen and enter your email address. You'll receive an email with a 6-digit code. Enter the code in the app, then set a new password (at least 8 characters).
Home screen at a glance
The home screen sums up the most important numbers and activity in your library at a glance.
Greeting & stats strip
At the top you'll see a time-of-day greeting with your first name. Just below it is a stats strip with three tiles: total book count, percentage read, and number of books lent out. Each tile is tappable and opens the library pre-filtered to the corresponding view.
Reading progress bar
Below the stats strip, a progress bar shows what share of your library you've already read. The bar updates automatically as soon as you mark a book "Read".
Currently reading
Books with the reading status "Reading" appear as a horizontal cover list. The section is hidden as long as you're not actively reading anything.
Recently added
A horizontal cover gallery of the ten most recently added books. Tap any cover to open its detail view.
Scanning & Adding Books
The fastest way to add books is via the camera tab in the centre of the tab bar.
ISBN scan
Select Barcode mode and point the camera at the ISBN barcode on the back of the book. The app recognises the code automatically and fetches metadata (title, author, publisher, cover) from multiple providers. Confirm the details, optionally choose a format (Paperback, Hardcover, …), then tap "Add".
After a successful scan there is a 4-second pause before the scanner accepts the next code — this prevents accidental duplicates.
Cover photo & manual search
Cover mode lets you photograph a book cover (experimental). Text mode lets you type a title or author name and search Google Books directly. Both paths end at the same confirmation view as the barcode scan.
Choosing a location before scanning
Before the scanner starts, you can optionally select a room and shelf. All books scanned in that session are automatically assigned to that location. You can skip this and assign a location later in the book detail view.
Duplicates
If an ISBN is already in your library, you'll see a prompt with three options: add a second copy, view the existing entry, or cancel.
Adding books without a network connection
When offline, a banner appears in the scanner. ISBN lookup is unavailable in barcode and cover mode — use manual text search instead to add the book provisionally. It appears in your library immediately and syncs to the cloud automatically once you're back online.
Quick Capture & Drafts
If you want to capture many books in a short time, Quick Capture is faster than the regular Scan tab. Books are saved as drafts first; you complete them later.
Opening Quick Capture
On the home screen, find the small camera-with-viewfinder icon in the top-right. Tap it to open Quick Capture in full-screen.
How Quick Capture works
Point the camera at a book cover. The app reads the title and author using on-device text recognition and automatically saves the book as a draft once the recognition is stable — you'll see a brief confirmation ("Book saved as draft"). Pan straight to the next book.
If the automatic match doesn't fire, tap the round shutter button at the bottom. The app captures the current frame, guesses title and author, and creates a draft.
Drafts on the home screen
As soon as you have at least one draft, a "N book(s) need review" row appears on the home screen. Tap it to open the review dialog.
Completing a draft
In the review dialog, tap a draft. A form opens with all the metadata fields (title, author, publisher, year, format). The "Search Online" button queries Google Books with the current values and fills the fields automatically. Save at the bottom to promote the draft to a full library entry.
Swipe-left on a draft to remove it if it was captured by mistake.
Your Library
The second tab gives you access to your entire collection with three different view modes.
Grid view
Displays all books as a three-column cover grid. Small icons in the upper-right corner of each cover indicate possession and reading status. Ideal for a quick visual overview.
List view
Books are grouped and listed by room. Each entry shows the cover, title, author, shelf location, and status chips. Books without a location appear at the end under "No location".
Shelves view
A visual shelf display per shelf: the focused book is shown as a full cover, neighbouring books appear as spines with rotated titles. Swipe horizontally to browse. Tap any book to open its detail view.
Filtering
Use the filter chips above the book list to narrow the view:
- All — entire library
- Unread — books with no reading status
- Reading — books currently being read
- Read — completed books
- Lent out — books currently away from home
- Borrowed — books you've borrowed from others
Sorting
Tap the sort icon next to the book count to change the sort order:
- Date added — newest first (default)
- Title — alphabetical
- Author — alphabetical by surname
- Price — highest first
Tap the active sort option again to reverse the direction (ascending / descending). An arrow icon shows the current direction. Books without a price always sort to the bottom in price mode.
Filtering by price status
You can show only books with a price set, or only books without a price — useful for quickly closing gaps in your pricing. A shortcut to all unpriced books is also available directly on the home screen, below the value widget.
Searching your library
Tap the search bar in the library. In Library mode your existing books are filtered by title, author, or ISBN. For the online search of new books and the buy options, see the dedicated "Online Search & Buy Options" section below.
Sync status
A cloud icon in the library toolbar shows the current sync status:
- Cloud with checkmark — fully synced
- Cloud with arrow — pending changes being uploaded
- Cloud with X — a sync error has occurred
Tap the icon to see a summary of pending operations.
Locations
The last tab is where you manage the physical layout of your home library — rooms and their shelves.
Creating rooms
Tap the + button and give the room a name (e.g. "Living Room"). Choose a room type (Living room, Bedroom, Office, Library, Storage, Hallway, Kitchen, Kids' room) and an accent colour. You can add shelves directly while creating the room.
Managing shelves
Each room can contain any number of shelves (e.g. "Top shelf", "Row A"). Tap the edit icon on a room to add, rename, or delete shelves. Deleting a shelf removes the location from any books stored there — the books themselves are not deleted.
Capacity
You can set a maximum book count for each shelf. The locations overview then shows the overall capacity fill percentage. The capacity field is optional.
Assigning books to a shelf
Open a book's detail view and tap "Edit". In the Location section, select a room and shelf. The new location is saved to the book straight away.
Lending
The fourth tab shows all books you've currently lent out or borrowed from others.
Lending out a book
Open the book and tap "Give away". Enter the borrower's name, the date, and an optional note. The book then appears under the "Lent out" tab with the status "Lent Out". Its possession status is automatically restored when you record the return.
Borrowing a book (from someone else)
Add the book to your library and choose the type "Got from" in the lending dialog. Enter the owner's name and date. The book appears under the "Borrowed" tab.
Recording a return
Tap a card in the lending tab. In the "Return" dialog, choose the return date and add an optional note. The book disappears from the lending list and reverts to "Owned".
Editing lending details after the fact
Open the book detail view. The status row shows the current lending entry with an edit button. Tap it to correct the date, contact name, or note without creating a duplicate entry.
Book Details
Tap any book in the library to open the detail view.
Basic information
The detail view shows cover, title, author(s), ISBN, publisher, publication year, language, and the list price (if known). Alongside it you'll see a placeholder for the estimated resale value — the actual valuation will follow as a Pro feature. Book metadata comes from the shared catalogue and is identical for all users who own the same ISBN.
Editing location, format & condition
Tap "Edit" to change the location (room and shelf), format (Paperback, Hardcover, E-book, Audiobook, Other), condition, and personal rating (1–5 stars) plus notes. Your changes are saved directly to the book.
Reading status
In the edit dialog you can set the reading status:
- Reading — the book appears on the home screen under "Currently Reading"
- Read — counted in statistics and filters
Reading status and possession status are independent — a lent-out book can simultaneously be marked as "Read".
Setting a price
The edit dialog has a "Price (€)" field. Enter your personal price (both period and comma are accepted as decimal separators). Your personal price takes precedence over the automatically fetched list price. The entered price is included in the library value shown on the home screen.
Lending history
At the bottom of the detail view you'll find the book's lending history: when you lent it out, borrowed it, or got it back — each with a date, contact name, and optional note. Entries can be backdated and edited after the fact. Books you've never lent or borrowed simply have no entries.
Deleting a book
Tap "Delete" in the detail view and confirm the dialog. The book is removed from your library. This action cannot be undone. The shared metadata catalogue is not affected.
Library Value
bksmrt totals the effective price of every book — your personally entered price takes precedence over the automatically fetched list price. Sold books are not counted.
Setting a price per book
You enter prices in the book detail view's edit dialog under "Price (€)" — see "Book Details → Setting a price". Both period and comma work as decimal separators.
Finding books with or without a price
In the library, the "With price" and "No price" filter chips narrow the list by price status — see "Your Library → Filtering by price status". This is the fastest way to spot gaps in your pricing.
Unread pile
If you have unread books with a price in your collection, the home screen shows an "Unread pile" row with the count and cumulative value. Tap it to open the library filtered to "Unread".
Online Search & Buy Options
The online search finds new books across multiple book databases at once — and lets you add them to your library or buy them at a bookseller directly.
Opening search
Tap the magnifying-glass icon in the top-right of the home screen, or the search bar in the library, and switch to the Online tab.
Quick vs. Thorough mode
Below the tab picker you'll find two pill buttons:
- Quick — queries Google Books only (~300 ms). Good for popular international titles.
- Thorough — fans out across Deutsche Nationalbibliothek, Google Books, and Open Library in parallel (~1–1.5 s). Recommended for German-language and niche titles where Google Books has gaps.
Tapping a pill both switches modes and fires the search. Your last choice is remembered.
How results are ranked
German-language hits (ISBN prefix 978-3-) appear at the top, so the top result's "Buy this book" link always lands on a title stocked in DACH retailers. Results without an ISBN are no longer dropped — they show an "ISBN fehlt" badge, and on Add the app tries to backfill the ISBN via DNB and Google Books.
"Do you have this book?" — the decision sheet
Tapping the plus icon on a result opens a dialog with two clearly separated sections:
- I have this book — "Yes, add to library" pulls the result into your collection as a new book.
- I want this book — add the title to your Want-to-read list, or go straight to buy at Thalia or Amazon; more retailers (e.g. Medimops for used books) are coming. The link opens the retailer's website in the browser.
A discreet "Soon: order directly at your local bookshop" hint points to the upcoming bookshop integration.
Buchpreisbindung & transparency
For new in-print books we deliberately don't show a price comparison — Germany's Buchpreisbindung mandates the same retail price across all retailers anyway. Each option therefore points to exactly one shop. If you buy through one of the Buy buttons we earn an affiliate commission; this is explained in detail in the privacy policy.
Duplicates
If the ISBN is already in your library, the familiar duplicate prompt (Add a second copy / View the existing entry / Cancel) is shown instead.
Back to your results
When you tap a Buy button, Safari opens. Coming back to the app, your results list is preserved — you can keep browsing without re-running the search.
Want-to-read list
The Want-to-read list is where you collect books you don't own yet but want to read — kept separate from your library so they don't skew your library value or stats.
Adding a book to the list
In the online search, or right after a scan, tap "Add to Want-to-read" in the "I want this book" dialog. The book goes onto your Want-to-read list without touching your library.
Browsing the list
Your Want-to-read list is available right from the home screen. Tap an entry to find a copy at Thalia in one tap — or pull the book into your library once it's on your shelf.
Friends & shared shelves
bksmrt has a private friends list — not a public feed. You connect with people deliberately and share only what you choose to.
Choosing an @handle
So friends can find you, set an @handle in your profile (3–20 characters). Your email address stays private. A toggle lets you decide whether you're discoverable by your handle.
Adding friends
In the Friends area, search for a person's @handle and send a request. They have to accept it — only then are you connected. You can accept or decline incoming requests.
Inviting by link
"Invite friends" creates a personal link (bksmrt.de/i/…). Anyone who opens it on an iPhone with the app installed can add you as a friend in one tap. A link never adds anyone automatically — confirmation is always up to you.
Sharing a shelf
For each book, the "Show on my shared shelf" toggle decides whether a friend can see it. Everything is private by default. Your notes and prices always stay private — only the title, author, and cover are shared.
Blocking & removing
From a friend's menu you can remove or block them. Either one instantly cuts off their access to anything you've shared.
Recommendations
Recommend books from your library to friends — with a personal note. Recommendations arrive in an inbox and can be added to the wishlist in one tap.
Recommending a book
Open a book in your library and tap "Recommend". Pick a friend, optionally add a short note (your rating is attached automatically), and send. Sending recommendations is a Pro feature.
Receiving recommendations
Recommendations show up in your inbox on the home screen — with the sender, the book, and the note. Receiving is always free.
Adding to your wishlist
In a recommendation, tap "Add to wishlist" and the book moves onto your wishlist in one tap. From there you can find a copy at a bookshop directly.
Notifications
If you allow it, you're notified the moment someone recommends a book to you. The app only asks for permission when the first recommendation arrives — never at launch. Only your name and the book title are sent.
Book clubs & reading circles
A book club brings your reading group into bksmrt: propose books together, vote on the next read, discuss each pick, and borrow copies from each other. You'll find your clubs in the "Club" tab.
Creating a club
In the "Club" tab, create a club with a name and emoji. Creating a club is a Pro feature — taking part is free for every member.
Joining by link
Every club has a standing invite link (bksmrt.de/c/…) and a QR code. Anyone who opens it on an iPhone with the app installed joins in one tap — no friend request, no approval queue. That's how you get a whole reading group on board in minutes.
Proposing & voting
Any member can propose books from their own library, their wishlist, or the online search. A tap lets you vote on the next shared read.
Current read & discussion
The host promotes a proposal to the "current read". It lands on every member's wishlist as a recommendation — notification included. Each book has its own discussion thread that stays available even after you've finished reading.
Owning & borrowing
Tapping "I have this book" shows others you own a copy. They can then ask to borrow it — the loan is recorded in the lending tracker as usual.
Managing members
As the host you can regenerate the invite link at any time (the old one stops working), remove members, and ban someone from the club if needed. Clubs are small and private — no public directory, no feeds.
bksmrt Pro
bksmrt's core features are free and stay free. Pro unlocks extra features and supports ongoing development.
What's free?
Scanning and cataloguing books, one room with three shelves, lending tracking, library value, the wishlist, friends, receiving and adding recommendations, and joining book clubs to read along — all of it is free.
What does Pro add?
Pro lifts the limit to unlimited rooms and shelves, lets you recommend books to friends, create and host your own book clubs, shows an estimated resale value with a value dashboard, and allows exporting your library as a CSV or GoodReads file.
Free trial & cancelling
You can try Pro free for 14 days. Management and cancellation go through your Apple ID; as a consumer in the EU you also have a statutory 14-day right of withdrawal. The subscription is handled through the App Store.
Account & Privacy
All account settings are accessible via the avatar icon in the top-right of the home screen.
Changing your display name
In the profile view you can edit your display name directly. Tap the edit icon next to your name, enter the new name, and confirm. The first name is used in the greeting on the home screen.
Changing your password
Tap "Change password" in the profile view. The app automatically sends a 6-digit code to your email address. Enter the code, then set the new password (at least 8 characters, confirmed twice).
Deleting your account (GDPR — Right to Erasure)
You can permanently and irreversibly delete your account and all associated data at any time. Scroll to the bottom of the profile view to find the "Danger Zone" section. Tap "Delete Account" and confirm by typing the word DELETE.
What is deleted:
- All your books, locations, lending records, and your Want-to-read list
- Your user profile and credentials
- All locally cached data on the device
What is retained:
- The shared book catalogue (ISBN metadata without personal data) — this contains no personal information
Deletion is performed server-side in an atomic transaction. An anonymised audit entry (SHA-256 hash of your user ID) is retained for 90 days for compliance purposes.
Signing out
Tap "Sign out" in the profile view. All locally cached data is removed from the device. You can sign in again on the next app launch.
Offline & Sync
How does offline mode work?
bksmrt stores your books and locations locally on the device. On launch, the local cache is loaded first — the app is immediately usable even without a network. In the background, the view is then updated with fresh data from the server.
Adding books while offline
Adding a new book works without a network: the book appears in your library immediately. As soon as the device is back online, the entry is automatically synced to the cloud. The provisional local ID is replaced by the server ID — this switch is invisible to you as a user.
What doesn't work without a network?
The following actions require a network connection and show an error if you're offline:
- Editing book details (location, price, format, condition)
- Recording or editing lending events
- Deleting books
- Managing rooms and shelves
Full offline support for these actions is planned for a future release.
Contact
Questions, feedback, or a bug report? Get in touch: hello@bksmrt.de